Please note these corrections/clarifications to the sewing patterns. The additions/clarifications are marked in red.
Love Nest™ Ruffle Dress
Cutting Layout:
Just a quick note about pieces Skirt Front Pattern Piece C and Skirt Back Pattern Piece D for clarification. You will only need ONE of Skirt Front Pattern Piece C in your fabric and only ONE of Skirt Back Pattern Piece D. When you cut the lining, the cutting layouts indicate that you should cut TWO of Skirt Back Pattern Piece D. This is correct. You will use the one piece placed on the fold as the front lining and the second as the back lining. For the one used as the front lining, you place the ruffles on (which is why it is best to cut it on the fold).
Step 2: a. Place the right-sides of the fabric and lining together (wrong-sides out) and pin together the necklines. Sew along the edge and turn the sewn pieces inside out. Press the edges of the neckline to lay flat. b. Once pressed, topstitch along the edge of the neckline (about 1/4″ from the edge) right-side out to keep it in place. Leave 1 inch unsewn on either side of the neckline to allow for the zipper later.
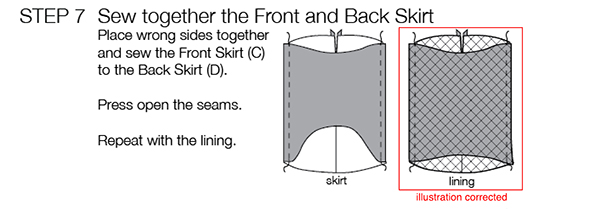
Step 7: Corrected illustration:
Step 14: Face the right-side of the ruffle fabric (G-H) with the wrong side of the lining. Please note that the wrong-side of the lining faces OUT. Pin and sew. Make sure the ruffle is pinned up far enough so that the seam is hidden by the outside fabric.

________________________________________________________________________________________
Playdate Outfit
There is no pattern piece K. This letter was skipped accidentally and there are no references, instructions, or pattern pieces referring to this letter.
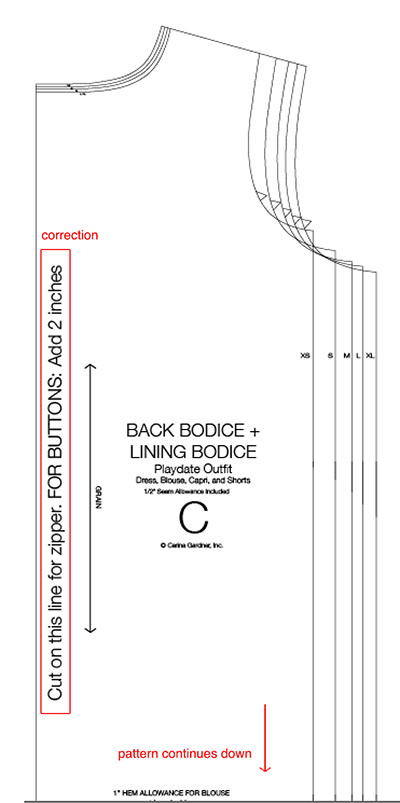 For the dress version, Piece C needed to be marked with an “ADD 2 INCHES HERE” on the left-hand edge for BUTTONS ONLY. If you are doing a zipper application, the pattern is fine as is. However, for buttons the extra 2 inches on either side of the back piece will give you the room you need in the back. If you have already cut out the back pieces (C), then simply cut out two 2 inch strips the length of the back piece and sew them along the edge. You can do this in a contrasting fabric to add contrast.
________________________________________________________________________________________
High Tea Soirée Dress
IF YOU SEE THE WORDS REPRINT AUGUST 2012 IN THE TOP RIGHT-HAND CORNER OF THE INSTRUCTIONS, YOU HAVE THE NEWEST VERSION OF THIS PATTERN’S INSTRUCTIONS INCLUDING ALL THE CORRECTIONS MADE HERE.
Steps 4-5 is a simpler way to sew together the bodice. The instructions in the pattern ALSO work well, but this consolidates the steps.

________________________________________________________________________________________
Little Miss Suntop and Skirt
IF YOU SEE THE WORDS REPRINT JUNE 2013 IN THE TOP RIGHT-HAND CORNER OF THE INSTRUCTIONS, YOU HAVE THE NEWEST VERSION OF THIS PATTERN’S INSTRUCTIONS INCLUDING ALL THE CORRECTIONS MADE HERE.
For the Blouse:
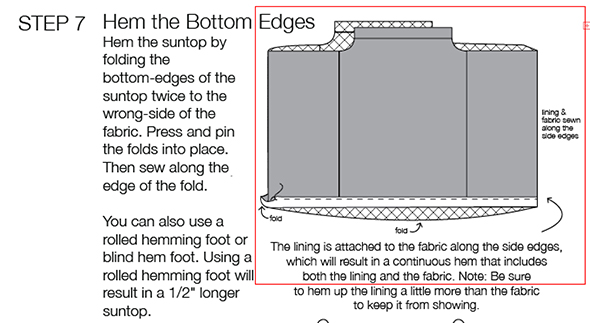
The illustration in Step 7 has more details to help explain how to hem the blouse better.
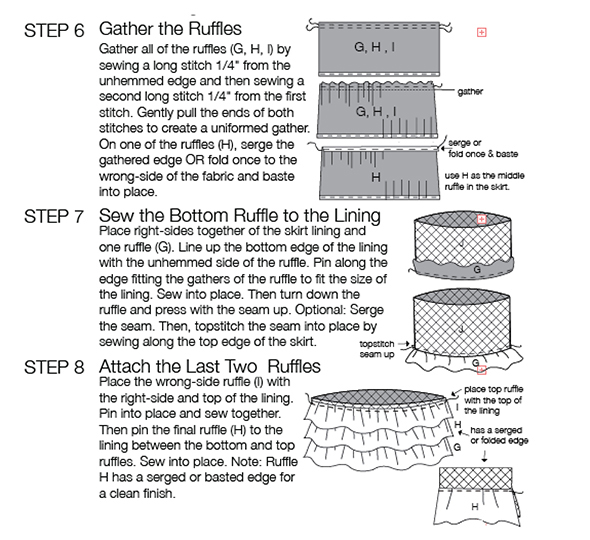
For the Skirt:
Step 3 Place RIGHT– sides of the lining of the skirt (J) together. (Illustration correct)
Step 4 Place RIGHT- sides of the ruffle pieces (G,H,I) and sew along the edges. (Illustration correct)
The following steps are not incorrect in the original pattern, but were added to clean up the ruffle edges and create a cleaner finished product.
________________________________________________________________________________________
Dainty Blossoms™ Sling
In the CUTTING LAYOUTS, you will need 2 pieces of Pattern Piece M not 1. Please cut out a second piece in the medium weight interfacing.
________________________________________________________________________________________
Chic Mademoiselle Outfit
Pattern piece B (Strap) is not included in the cutting layouts. Place pattern piece B on a folded piece of selvage and cut one piece.
________________________________________________________________________________________
Kimono Skirt
IF YOU SEE THE WORDS REPRINT JULY 2012 IN THE TOP RIGHT-HAND CORNER OF THE INSTRUCTIONS, YOU HAVE THE NEWEST VERSION OF THIS PATTERN’S INSTRUCTIONS.
+ Please note that you can find the extended version of the cutting layouts for the Kimono Skirt, by going here.
Under Cutting Layouts, Fabric 3 Cutting layouts work for ALL sizes (currently it only says XS, S, M, L). It also works for XL and XXL.